Word is a staple for every worker and student. This amazing tool has many functions designed to make the creation of documents easy and to a high standard. Below are some features of Word that can add a little extra something to your document and help with a more professional design.
Layouts
Set Styles
Styles can be applied to different sections of text within the document, which will apply all of the relevant formatting to that text across all the places that style is used. An example being the headings within the document; If you wish to have a set style for all of the main headings you can select one from the pre-set list in word - or define your own. Changes are then propagated throughout the document avoiding the time consuming task of updating the changed style individually each time it is used. The image below shows the available styles, which can be found in the ‘Design’ tab.

1: Styles Pane
Personalised Styles
If the styles need to follow certain guidelines, or if you don’t like any of the pre-set styles, you can create and save your own style. The styles created can be saved and used in the current document and future documents.
To create a style, select ‘Create a Style’ from the styles pop-out menu. From there, a pop-up will appear and located at the bottom of the pop-up will be a ‘Modify’ button - click this.
Clicking ‘Modify’ will extend the display to show all of the options you have the ability to change including naming the style, useful for future reference. Once you have entered all conditions and formats desired, click ‘OK’. The style has now been created and should appear within the styles bar. The style created within the example has been named ‘Top Tips’. In future to apply this style, just select the text you want to style and click on this new item in the Ribbon bar.

2: Select Modify to get more options

3: Change all desired fields

4: Top Tips style creation

5: New style within the Style pane
Columns
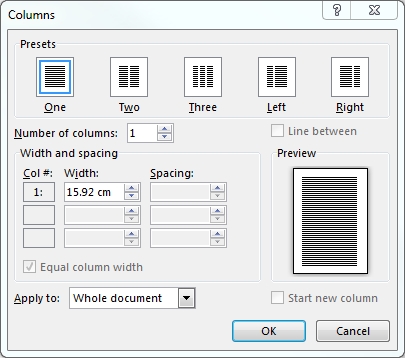
For the majority of documents the one column layout that is set as default is sufficient. However this may not always fit the purpose or design intent for the document. In these situations, such as the creation of a news article or information poster, Word offers the possibility of manually setting how many columns are wanted within the document. Not onlycan the number of columns be selected but their individual widths can be edited if the user doesn’t want each column uniform. This can be found within the Layout tab, on the left-hand side.

6: Layout - Columns

7. Column options
Orientation
It isn’t always the case that the document is desired to be portrait. To change to landscape all that needs to be done is go to the Layout tab along the top of the taskbar and select Orientation and then Landscape.
When it comes to documents that need to contain a range of different orientations then this is easily completed. Where you find the orientation button if you look along to the right of the Page Setup section there is a little arrow, clicking on this will extend out all of the options available, shown in the image below. Giving you the option to change the documents orientation for either the whole document or just onwards from where the cursor is placed.
If you are only changing one page of the complete document make sure the cursor is placed at the bottom of the prior page, rather than the start of a fresh page. Doing this will mean there will be no undesired blank portrait/landscape page created.When used with section breaks (also useful when using changes layout using different numbers of columns) this can be a power layout control tool.

8. Orientation extended menu
Further Reading
For more information, please visit:


